5.5. Productive - low budget
As some implementations have very low resources regarding hardware and system administrators this example is meant as a base for a GNU Health server with all in one system. Nevertheless the backup server is separated and the client(s) as well. Together with the Ansible controller the desired system looks like this:
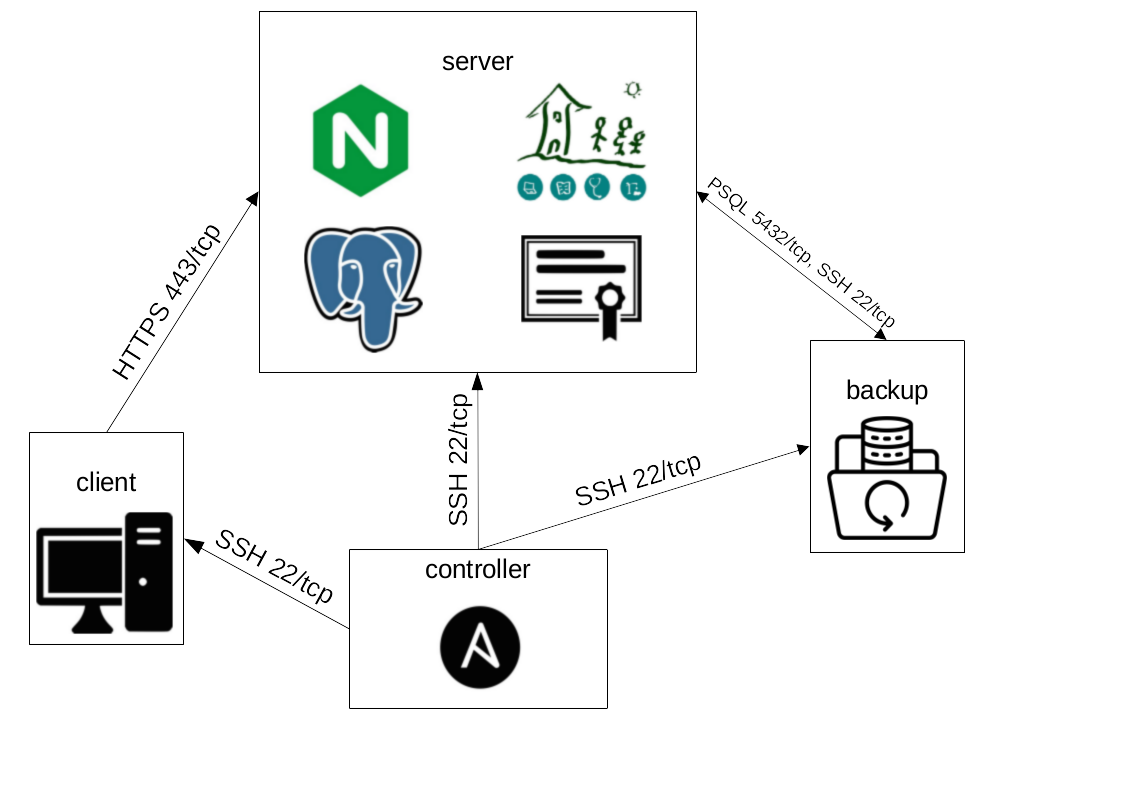
In this example we are using the following host names associated with the following IP addresses:
server ↔ 192.168.60.110
backup ↔ 192.168.60.111
client ↔ 192.168.60.112
controller ↔ 192.168.60.113
You have to replace those by your given host names and IP addresses. Those Virtual Machines (VMs) are expected to be in place and accessible using SSH. If you do not have a way to set up VMs you can use the Vagrantfile in vagrant/gnuhealth_prod_small for a first test (needs VirtualBox & Vagrant installed, then simply run vagrant up and vagrant ssh controller).
For this example we are using Debian 12. Regarding the controller and client you could easily change to FreeBSD, openSUSE Leap or Ubuntu as well (or any other distro you want to integrate yourself). But for the servers it is recommended to choose Debian. Complex scenarios will only be developed and tested on Debian in the near future as we see in it the best balance between a robust system with a big community on the one hand and a philosophy following the principles of free software to the greatest extent on the other hand.
In order to follow this tutorial you need the following prerequisites:
4 VMs as stated above (target SSH & sudo user assumed to have the same name across the systems)
A password manager - if you don’t have one check KeePassXC. Install it either on controller or on e.g. your laptop.
A dummy email address to be used for sending emails from the server. It’s highly recommended to use a throwaway email address for that. This will be called source@example.com and you have to replace it by yours.
Any email address to receive emails from the server. That one could also be one actually in use. This will be called target@example.com and you have to replace it by yours.
First of all login to your controller and follow the first example to install the requirements and clone & enter this repository but don’t execute any Playbook. Besides we will need the packages sshpass and python3-venv. Then execute the SSH playbook in order to create a local SSH key pair and copy the public one in a desired directory:
$ sudo apt install -y sshpass python3-venv
$ ansible-playbook playbooks/ssh.yml -i inventories/dev -c local -e ssh_key_create=1 -e ssh_key_user=`whoami` -e ssh_key_fetch=1
From now on we will copy the default inventory in another place in order to modify it:
$ cp -r inventories/dev inventories/test/gnuhealth_prod_small
For start we will modify the hosts file such that it looks like this:
[gnuhealth]

[gnuhealth:children]
gnuhealth_app
gnuhealth_psql
gnuhealth_nginx
gnuhealth_ownca
gnuhealth_bak

[gnuhealth_app]
server ansible_port=22

[gnuhealth_psql]
server ansible_port=22

[gnuhealth_nginx]
server ansible_port=22

[gnuhealth_ownca]
server ansible_port=22

[gnuhealth_bak]
backup ansible_port=22


[desktop]
client ansible_port=22


[application:children]
gnuhealth_app

[postgresql:children]
gnuhealth_psql

[nginx:children]
gnuhealth_nginx

[ownca:children]
gnuhealth_ownca

[bak:children]
gnuhealth_bak


[ssh]

[ssh:children]
gnuhealth
desktop
Next we disable host key checking and test if we can ping the servers (alternatively connect manually and compare the fingerprints - here we assume to have an overseeable internal network):
$ export ANSIBLE_HOST_KEY_CHECKING=False
$ ansible -i inventories/test/gnuhealth_prod_small ssh -m ping -k
Now we roll a random port between 49152 and 65535 for SSH because the numbers below are used by other services and the greater numbers can not be used. This makes it harder to attack our SSH service.
$ echo $(python3 -S -c "import random; print(random.randint(49152,65535))")
Throughout the tutorial you will have to replace 63671 by the number you got after running the command.
Then edit the following values like this in inventories/test/gnuhealth_prod_small/group_vars/ssh/vars.yml:
ssh_username: vagrant
[...]
ssh_key_trust_local_paths:
  - key: ../fetch/controller.pub
    user: vagrant
[...]
ssh_set_port: true
ssh_port: 63671
ssh_disable_pw_auth: true
ssh_set_log_level: true
For ssh_username you have to set your username that was set during the installation. This is also a placeholder that you will have to replace continuously. Note that the path ../fetch/controller.pub also depends on the host name of the controller.
Now we call the SSH playbook on the servers and client in order to trust the controllers SSH key, change the port, disable password based authentication for security reasons and enable debug logging because we will install Fail2Ban later on to detect attacks:
$ ansible-playbook playbooks/ssh.yml -i inventories/test/gnuhealth_prod_small -K -k
The flags -K and -k lead to prompts for the SSH and sudo password which are probably the same.
As we changed the port and forced key based SSH authentication we will now update our hosts file and make sure that we can still connect:
$ sed -i "s/ansible_port=22/ansible_port=63671/g" inventories/test/gnuhealth_prod_small/hosts
$ ansible -i inventories/test/gnuhealth_prod_small ssh -m ping
If SSH works well we overwrite the config file with the default one again because the SSH role is also called from other roles:
$ cp inventories/dev/group_vars/ssh/vars.yml inventories/test/gnuhealth_prod_small/group_vars/ssh/vars.yml
Next step is to encrypt and edit the vault.yml for GNU Health as this will contain passwords that will be used or set later on. First generate a strong password with at least 20 digits and then run this commands:
$ ansible-vault encrypt inventories/test/gnuhealth_prod_small/group_vars/gnuhealth/vault.yml
$ ansible-vault edit inventories/test/gnuhealth_prod_small/group_vars/gnuhealth/vault.yml
In case you are not familiar with vim: Press i to start editing and Esc + wq + Enter to write and quit if you finished. We want the following changes in that file:
vault_ssh_user: vagrant
vault_ssh_password: vagrant
vault_set_sudo_pass: true
[...]
vault_psql_pw: 'rollastrongpasswordplease'
vault_psql_pw_barman: 'rollastrongpasswordplease'
vault_mail_pw: 'putactualemaildummypasswordhere'
vault_tryton_pw: 'rollastrongpasswordplease'
[...]
vault_rstc_pw: 'rollastrongpasswordplease'
vault_gh_bak_password: 'rollastrongpasswordplease'
vault_gh_bak_salt: 'rollastrongsaltplease'
Where vault_ssh_user is your username as you set previous for ssh_username, vault_ssh_password is your sudo password (you can skip it if you use passwordless sudo or always use the -K flag when calling playbooks) and vault_mail_pw the actual password of your dummy email account that was mentionned in the prerequisites on top. All the other values are for passwords to set later on thus roll them with your password manager.
Now we will modify plenty of values in the vars.yml configuration file for GNU Health:
[...]
gh_tryton_admin_mail: 'target@example.com'
[...]
psql_hba_rules:
  - "local\tall\t{{ psql_db_users[0].name }}\t\t\t\t\tpeer"
  - "hostssl all barman 192.168.60.111/32 scram-sha-256"
  - "hostssl replication streaming_barman 192.168.60.111/32 scram-sha-256"
psql_set_encoding: true
psql_encoding: 'UTF-8'
psql_set_locale: true
psql_locale: 'de_DE'
psql_barman_host_port: 63671
[...]
nginx_rproxy_domain: server
nginx_https: true
nginx_http: false
[...]
backup: true
brm_ssh_port: 63671
brm_ssh_port_psql: 63671
rstc_client_target: [...]<change 22 to 63671>[...]
[...]
locale: true
<set de_DE twice in lcl_* values>
[...]
fail2ban: true
f2b_nginx: "{{ inventory_hostname in groups.nginx }}"
[...]
ssmtp: true
ssmtp_mail_hub: "smtp.web.de:465"
ssmtp_mail_address: 'source@example.com'
[...]
logwatch: true
lw_mailto: 'target@example.com'
[...]
systemd_alert: true
sa_admin_mail: 'target@example.com'
[...]
timezone: true
tz_timezone: 'Europe/Berlin'
[...]
nftables: true
nft_network_interface: '{eth0,eth1}'
nft_internal_subnet: '192.168.60.0/24'
nft_allow_input_lines:
  - "iif {{ nft_network_interface }} tcp dport 5432 ip saddr 192.168.60.110/32 accept"
  - "iif {{ nft_network_interface }} tcp dport 5432 ip saddr 192.168.60.111/32 accept"
  - "iif {{ nft_network_interface }} tcp dport 443 ip saddr {{ nft_internal_subnet }} accept"
  - "iif {{ nft_network_interface }} tcp dport 63671 accept"
If you want to look deeper in the configuration options you can also find all the roles variables documented in the roles chapter of this documentation. The inventory that is continuously created in this example can also be created by running a BASH script from inside the repositories top level directory:
$ bash inventories/test/generate_gnuhealth_prod_small.sh
Now we are prepared to run the playbook in order to configure the main server and the backup system:
$ ansible-playbook playbooks/gnuhealth.yml -i inventories/test/gnuhealth_prod_small --ask-vault-pass
Ansible aims to be idempotent which means that you always produce the same state even if you run a playbook multiple times. And you don’t want something to change something back and forth. Run the same command again and check that every single task is green / okay and not a single one yellow / changed (and not failed either of course).
Similarly to the gnuhealth group we will now configure the configuration for the client before we run the desktop.yml playbook. Generate and save another password for the encryption of Ansible Vault, then encrypt and open the configuration file:
$ ansible-vault encrypt inventories/test/gnuhealth_prod_small/group_vars/desktop/vault.yml
$ ansible-vault edit inventories/test/gnuhealth_prod_small/group_vars/desktop/vault.yml
Those values are only for connecting, not to create new passwords:
vault_ssh_user: vagrant
vault_ssh_password: vagrant
vault_set_sudo_pass: true
We will also set some values in the unencrypted configuration file:
ghcl_profile_name: Tutorial
ghcl_trust_certs: true
timezone: true
tz_timezone: 'Europe/Berlin'
The ghcl_profile_name will be displayed later on when using the client. It is necessary to trust the certificate that signed the one of the server but this is handled by the default configuration after setting ghcl_trust_certs to true. And we set a timezone again.
Finally run this playbook twice as well and the system is set up:
$ ansible-playbook playbooks/desktop.yml -i inventories/test/gnuhealth_prod_small --ask-vault-pass
One obvious thing to test is if you can connect to the server from the client: Log in to the client, run the GNU Health client, click connect and enter the password that was set in gnuhealth/vault.yml as vault_tryton_pw. Follow the wizard to create an user and an institution. This is also useful for a restore test later on.
Then login to the server and check email alerts, locale and timezone:
$ sudo systemctl restart nginx postgresql gnuhealth
$ sudo logwatch
$ sudo su postgres -c "psql -l"
$ timedatectl
Now login to backup and trigger Fail2Ban by continuously executing this command:
$ ssh -p 63671 wrongusername@server
This does not work with the right username, see this discussion on that topic:
https://github.com/fail2ban/fail2ban/issues/1477#issuecomment-599269395
Back on server you can show and unban your backup system like this:
$ sudo fail2ban-client status sshd
$ sudo fail2ban-client set sshd unbanip 192.168.60.111
Now login to client and verify that the firewall configuration is working:
$ sudo apt install -y nmap
$ sudo nmap -p 5432 server
$ sudo nmap -p 5432 backup
$ sudo nmap -p 63671 server
$ sudo nmap -p 63671 backup
Those ports should all be closed for the client or any other system that is not one of themselves or the controller.
Apart from SSH we can also check if the GNU Health client is protected: Open the client and enter wrong credentials until you get an error stating ‘Too many requests’. By default 5 failed login attempts should lead to 5 minutes being banned. This can be configured in your trytond.conf. You might also want to check that only the target machine gets banned and not further systems in the same network.
Finally let’s perform a restore. Login to server, stop the services and delete all data:
$ sudo systemctl stop gnuhealth postgresql
$ sudo find /var/lib/postgresql/15/main/ /opt/gnuhealth/var/lib/ -mindepth 1 -delete
Obviously you would not run this command on your productive system. This is just to test the restore functionality in time. If you have to perform a restore on the productive system, make sure to test it on another one before and move the data to another path instead of deleting it. Afterwards perform the restore from controller:
$ ansible-playbook playbooks/gnuhealth.yml -i inventories/test/gnuhealth_prod_small/ -e brm_restore=1 -e rstc_client_restore=1 -e postgresql="" -e application="" -e nginx="" --ask-vault-pass
Then wait for PostgreSQL coming back and restart GNU Health once it’s up again:
$ sudo tail -f /var/log/postgresql/postgresql-15-main.log
$ sudo systemctl restart gnuhealth
After that use the client to verify you can connect again and still have your data. Note that we only restored the data on your existing system and you still have to set up a strategy how to recreate the whole server with the existing data.