
The GNU Health Message and Authentication Server
Note
This document is licensed under Creative Commons Attribution-ShareAlike 4.0 International (CC BY-SA 4.0)
| Author: | Luis Falcon |
|---|---|
| Contact: | info@gnuhealth.org |
| Version: | 0.9.18 |
Introduction
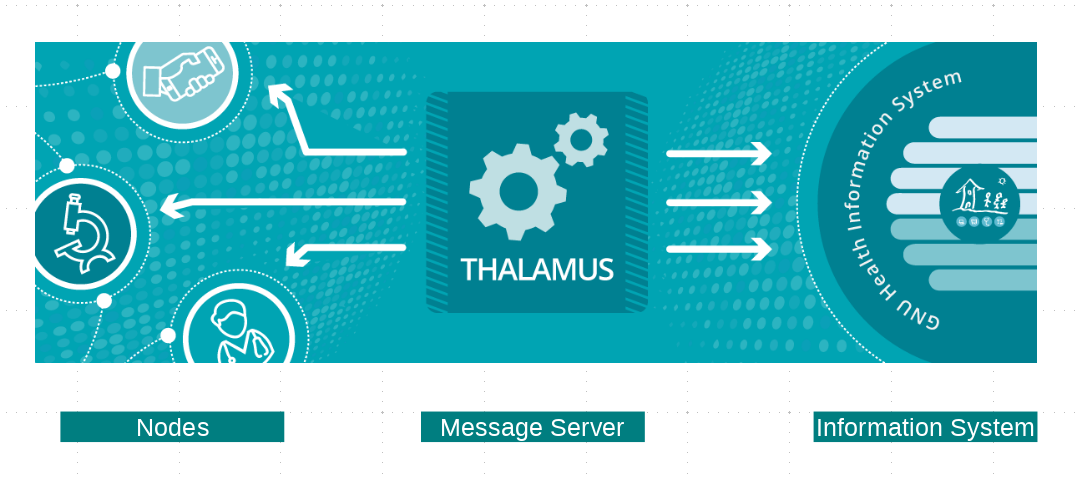
The Thalamus project provides a RESTful API hub to all the GNU Health Federation nodes. The main functions are:
- Message server: A concentrator and message relay from and to the participating nodes in the GNU Health Federation and the GNU Health Information System (PgSQL). Some of the participating nodes include the GNU Health HMIS, MyGNUHealth mobile PHR application, laboratories, research institutions and civil offices.
- Authentication Server: Thalamus also serves as an authentication and authorization server to interact with the GNUHealth Information System
Thalamus is part of the GNU Health project, but it is a self contained, independent server that can be used in different health related scenarios.
Technology
RESTful API: Thalamus uses a REST (Representional State Transfer) architectural style, powered by Flask technology
Thalamus will perform CRUD (Create, Read, Update, Delete) operations. They will be achieved via the following methods upon resources and their instances.
- GET : Read
- POST : Create
- PATCH : Update
- DELETE : Delete.
The DELETE operations will be minimal.
JSON: The information will be encoded in JSON format.
Resources
Some resources and end-points are:
- People (/people)
- Pages of Life (/pols)
- DomiciliaryUnits (/domiciliary-units)
- PersonalDocs (/personal_docs)
Configuration
- Create a new user thalamus with PostgreSQL permissions
- Install PostgreSQL and create an operating system user called thalamus
- Restart PostgreSQL
Initializing PostgreSQL for the HIS and Person Master Index
The following documentation applies to a demo / test database, that we will call "federation"
Create the database:
$ createdb federation
Locate thalamus:
$ pip show thalamus
$ cd </path/thalamus/demo/>
#. Create the Federation HIS schema. Inside the "demo" directory in Thalamus execute the following SQL script:
$ psql -d federation < federation_schema.sql
#. Set the PostgreSQL URI for demo data: In import_pg.py adjust the variable PG_URI to fit your needs. It could be sufficient to just put "dbname='federation'" into psycopg2.connect(...) if your setup fits the default settings.
Initialize the Federation Demo database:
$ bash ./populate.sh
#. Set the PostgreSQL URI for runtime: Just like in the second step modify POSTGRESQL_URI in etc/thalamus.cfg
At this point you can run and test Thalamus directly from the Flask Werkzeug server:
$ python3 ./thalamus.py
This is ok for development and testing environments, but for production sites, always run Thalamus from a WSGI container, as described in the next section.
Running Thalamus from a WSGI Container
In production settings, for performance reasons you should use a HTTP server. We have chosen gunicorn .
For example, you can run the Thalamus application from uWSGI as follows. The default configuration file uses secure (SSL) connections:
$ gunicorn --daemon -c etc/gunicorn.cfg thalamus:app
For development, if you want to run it directly from the Flask Werkzeug server,:
$ python3 ./thalamus.py
Examples
Command-line, using httpie
Retrieve the demographic information of person:
$ http --verify no --auth ITAPYT999HON:gnusolidario https://localhost:8443/people/ESPGNU777ORG
Yields to:
HTTP/1.1 200 OK
Connection: close
Content-Length: 411
Content-Type: application/json
Date: Fri, 21 Apr 2017 16:22:38 GMT
Server: gunicorn/19.7.1

{
    "_id": "ESPGNU777ORG",
    "active": true,
    "biological_sex": "female",
    "dob": "Fri, 04 Oct 1985 13:05:00 GMT",
    "education": "tertiary",
    "ethnicity": "latino",
    "gender": "female",
    "lastname": "Betz",
    "marital_status": "married",
    "name": "Ana",
    "password": "$2b$12$cjrKVGYEKUwCmVDCtEnwcegcrmECTmeBz526AAD/ZqMGPWFpHJ4FW",
    "profession": "teacher",
    "roles": [
    "end_user"
    ]

}
Retrieve the demographics information globally:
$ http --verify no --auth ITAPYT999HON:gnusolidario
  https://localhost:8443/people
Yields to:
HTTP/1.1 200 OK
Connection: close
Content-Length: 933
Content-Type: application/json
Date: Fri, 21 Apr 2017 16:31:23 GMT
Server: gunicorn/19.7.1

[
    {
        "_id": "ITAPYT999HON",
        "active": true,
        "biological_sex": "female",
        "dob": "Fri, 05 Oct 1984 09:00:00 GMT",
        "education": "tertiary",
        "ethnicity": "latino",
        "gender": "female",
        "lastname": "Cordara",
        "marital_status": "married",
        "name": "Cameron",
        "password": "$2b$12$Y9rX7PoTHRXhTO1H78Tan.8mVmyayGAUIveiYxu2Qeo0ZDRvJQ8/2",
        "profession": "teacher",
        "roles": [
        "end_user",
        "health_professional"
        ]

    },

    {
        "_id": "ESPGNU777ORG",
        "active": true,
        "biological_sex": "female",
        "dob": "Fri, 04 Oct 1985 13:05:00 GMT",
        "education": "tertiary",
        "ethnicity": "latino",
        "gender": "female",
        "lastname": "Betz",
        "marital_status": "married",
        "name": "Ana",
        "password": "$2b$12$cjrKVGYEKUwCmVDCtEnwcegcrmECTmeBz526AAD/ZqMGPWFpHJ4FW",
        "profession": "teacher",
        "roles": [
        "end_user"
        ]

    }

]
Using Python requests:
>>> import requests
>>> person = requests.get('https://localhost:8443/people/ESPGNU777ORG', auth=('ITAPYT999HON', 'gnusolidario'), verify=False)
>>> person.json()
  {'_id': 'ESPGNU777ORG', 'active': True, 'biological_sex': 'female','dob': 'Fri, 04 Oct 1985 13:05:00 GMT',
  'education': 'tertiary', 'ethnicity': 'latino', 'gender': 'female', 'lastname': 'Betz', 'marital_status': 'married',
  'name': 'Ana', 'password': '$2b$12$cjrKVGYEKUwCmVDCtEnwcegcrmECTmeBz526AAD/ZqMGPWFpHJ4FW', 'profession': 'teacher',
  'roles': ['end_user']}
Note on roles The demo user "ITAPYT999HON" is a health professional (health_professional role), so she has global access to demographic information.
The user "ARGBUE111FAV" with the password "freedom" is the "root" user for thedemo database.
Check the roles.cfg file for examples information about roles and ACLs.
Community server
If you want to test our demo community server, you can use the following URL:
https://federation.gnuhealth.org:8443/
WARNING: THIS IS PUBLIC, OPEN DEMO SERVER, DO NOT USE REAL PATIENT DATA!
Demo users and roles:
- ESPGNU777ORG (role:normal user). password: "gnusolidario"
- ITAPYT999HON (role: health professional). password: "gnusolidario"
- ARGBUE111FAV (role: root) . password: "freedom"
Development
Thalamus is part of the GNU Health project.
The development happens at Codeberg (https://www.codeberg.org/gnuhealth)
You can suscribe to health-dev and health mailing lists at GNU Savannah for development and general discussions repesctively.
For more information and to suscribe to our mailing lists, please see: https://docs.gnuhealth.org/his/support.html#online-resources
Release Cycle
Thalamus, as other GNU Health components, will follow its own release process.